

Network Rack Setup: A Practical Guide for Homes and Offices
A good network rack setup comes down to five decisions made in the right order: what goes in, how big the rack needs to be, where it lives, how the gear and cables are laid out, and how you test it before anyone relies on it. Get those right and the rack is quiet, cool and easy to fix. Get them wrong and you have a tangle behind a cupboard door that nobody wants to touch.
This guide walks through each step in plain language, for a home with a lot of connected gear, a home office, or a small business with a comms cupboard.
Key takeaways
- List every device first, then add roughly 25 to 30 per cent spare space to the rack height so you can grow without starting again.
- Wall-mount racks suit a few devices; floor-standing cabinets suit a UPS, a NAS or heavier switches.
- Plan the layout on paper, label both ends of every cable, and keep air able to move around the gear.
- Any new power outlets or fixed wiring should be done by a licensed electrician.
- Power up one device at a time and check its lights before you call the job finished.
Table of Contents
- What a network rack is, and what goes in it
- Step 1: List your gear before you buy anything
- Step 2: Choose the rack type and size
- Step 3: Pick the right location
- Step 4: Gather your tools and parts
- Step 5: Assemble and mount the rack
- Step 6: Lay out and label for easy troubleshooting
- Step 7: Power, earthing and airflow
- Step 8: Power up and test
- Common mistakes to avoid
- Our perspective
- When to get a professional to do it
- FAQ
- Sources
What a network rack is, and what goes in it
A network rack is a metal frame that holds, organises and protects network hardware such as switches, routers and modems. In practice that usually means:
- the modem or NBN connection device and the router or firewall
- one or more network switches, often PoE if you run cameras or access points
- a patch panel, which gives every wall socket in the building a neat, labelled port
- a UPS (battery backup) so a brownout does not drop the whole network
- a NAS or small server, if you have one
- a CCTV recorder, if your cameras record on site
Australian manufacturer Argent notes that racks also commonly hold servers, UPS units and even audio and video equipment, and that the most common style is an enclosed cabinet that gives the hardware a protective shell.
Network racks are usually shallower than server racks, because switches and patch panels are lighter and not as deep as servers. If you only have networking gear, you probably do not need a deep server cabinet. If you plan to add a rack-mount server or a big UPS later, buy for that now.
Step 1: List your gear before you buy anything
Before you look at a single cabinet, write down every device that will live in the rack, with its height, depth and weight. Rack equipment is measured in rack units (RU). One RU is 44.45 mm under the IEC 60297 standard for 19-inch equipment, so a 24-port switch that is 1RU tall takes one slot, and a typical patch panel takes one more.
A simple example for a home office or small clinic:
| Item | Typical height |
|---|---|
| Patch panel (24 port) | 1RU |
| PoE switch | 1RU |
| Router or firewall shelf | 1RU |
| Cable management bar | 1RU each |
| UPS | 2RU or more, depending on model |
| NAS or CCTV recorder | 1 to 2RU |
Check the product page for each item rather than trusting this table. Some gear is not rack-mount at all, and needs a shelf.
Step 2: Choose the rack type and size
Wall-mount or floor-standing
A wall-mount rack suits a modest amount of equipment. A floor-standing cabinet suits servers, UPS systems and many switches. As a guide to what is on the market, Argent's security racks come as wall-mount units in 6, 12 and 18RU, and free-standing racks from 18 to 46RU.
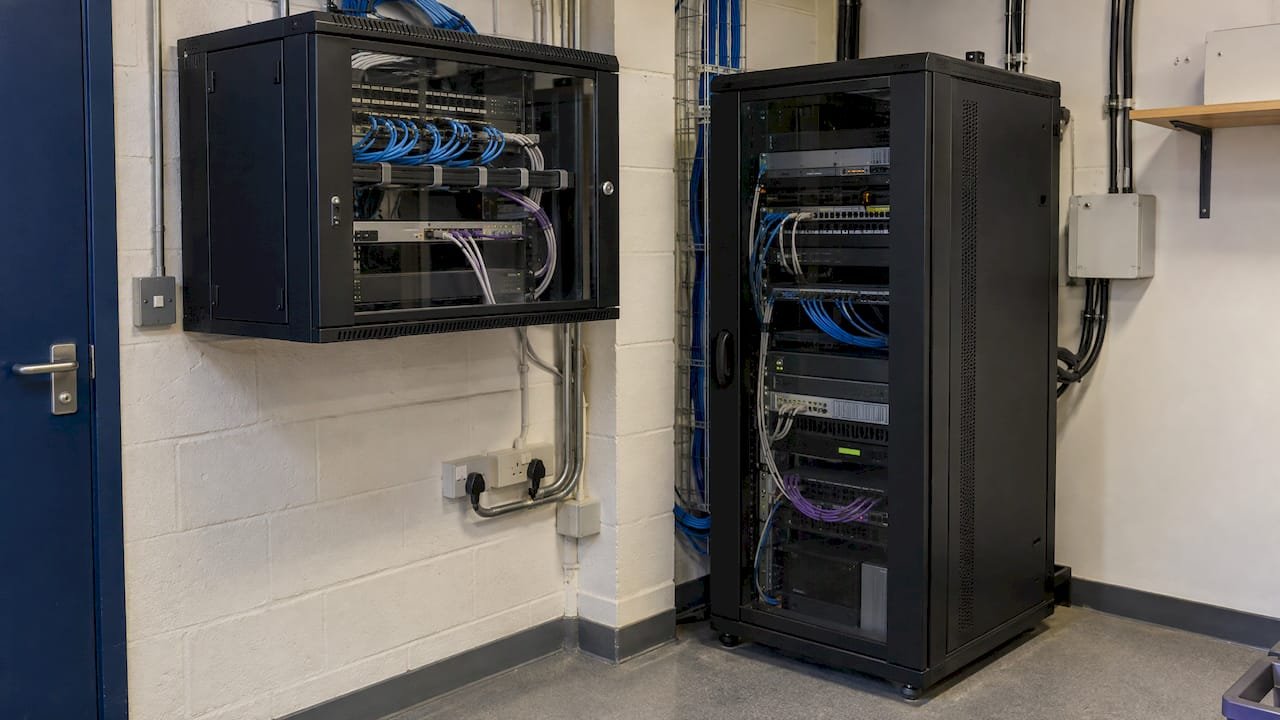
If the rack will hang on a wall, check what the wall is made of and what it can carry. A full wall-mount cabinet with a switch, a UPS and a recorder is heavy. Fix it into studs or masonry, never plasterboard alone.
Height: add room to grow
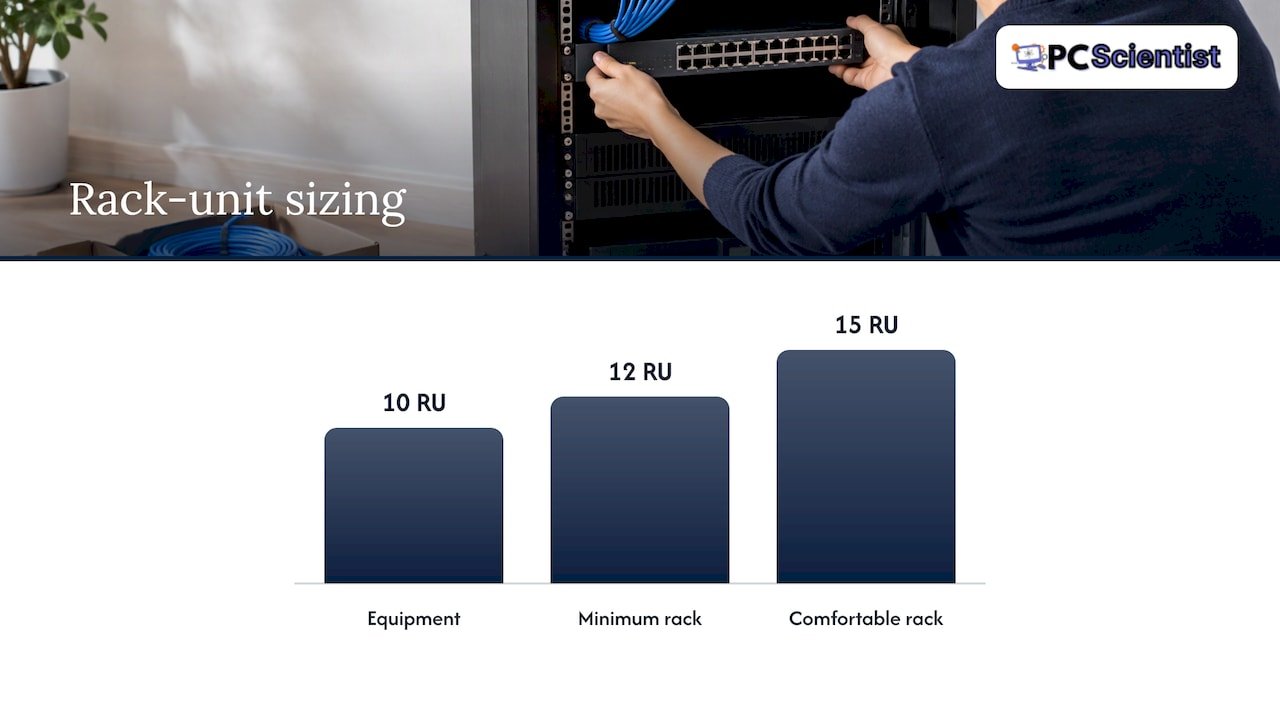
Total up your RU, then add spare. One guide suggests adding about 30 per cent to the total, and Argent describes 25 to 30 per cent spare as a common rule of thumb. Ten RU of gear points to a 12RU rack at the least, and a 15RU or larger one is a comfortable choice if you expect more cameras or access points.
Depth, width and weight
Compare the deepest device to the usable mounting depth of the cabinet, and leave room behind it for cables and connectors. Schneider Electric's guidance is that networking racks are generally 750 mm wide by 1070 mm deep to fit cabling trunks, and it advises allowing for airflow and servicing clearance. That is a big-office figure. A small wall-mount cabinet will be far smaller, but the principle holds: measure the gear, add cable space, then choose.
Also check the cabinet's load rating against your heaviest items, especially a UPS, which is often the heaviest thing in the rack.
Step 3: Pick the right location
The best spot is cool, dry, dust-free and easy to reach. Think about:
- Heat. Switches, recorders and especially UPS units give off heat. University electrical standards call for ventilation and temperature control so equipment stays within its rated maximum temperature, and say equipment that produces a lot of heat, such as UPS systems, needs special thought. In a hot NSW summer, a sealed garage cupboard or a roof space is a poor choice.
- Access. You need to open the door fully and reach the back. A rack behind a washing machine will not be maintained.
- Cable runs. Place it near where your cables arrive. In a home, that is often the main-floor hallway, a study or a utility room. If you are not sure whether to run cable or lean on other options, our guide to network cabling versus powerline covers the site checks.
- Power. A rack needs outlets close by. Adding fixed power points is electrician's work, and new electrical work must comply with relevant Australian Standards and WHS requirements. Do not run power boards in a daisy chain to make up the difference.
Building or renovating? This is the cheapest time to pick a rack location, because cable is far easier to run before the walls are lined. Our CCTV prewire guide shows how the same planning works for cameras.
Step 4: Gather your tools and parts
Most of what you need is small and cheap. Australian network suppliers list the usual kit as cage nuts, screw kits, crimpers, testers, punch-down tools and labelling equipment. In practice:
- cage nuts and screws that match your rack (square holes need cage nuts)
- a Phillips screwdriver and a cage nut tool, so you do not scrape your hands
- a punch-down tool for the patch panel
- a cable tester
- Velcro ties (not tight plastic zip ties, which can squash cable)
- a label printer or pre-printed cable labels
- short patch leads in a few lengths and a couple of colours
- horizontal cable management bars and, in a cabinet, vertical managers
If you are also tidying power and airflow, the accessories matter as much as the rack. Choosing sensibly between mounting hardware, power distribution and cable organisation is a good place to see how access control systems are wired, since a door controller and its power supply often end up in the same cupboard as your network gear.
Step 5: Assemble and mount the rack
- Unpack and check parts. Count the rails, shelves, screws and doors against the list before you start.
- Assemble the frame. For a cabinet, set the adjustable rails to the same depth on both sides, and confirm the orientation is right before tightening anything.
- Position it. Move the rack into its final spot first. Moving a loaded rack is a bad idea.
- Secure it. Fix wall-mount racks to the wall. Floor-standing cabinets should be levelled and, if they are tall, anchored or stabilised.
- Fit cage nuts and shelves. Install the shelves and rails before the heavier equipment. Heavy items go low, so the rack is not top-heavy.
- Mount the patch panel and cable managers. Larger installations specify horizontal and fibre cable managers at set rack-unit positions, which is a good habit at any size: put a manager above and below each patch panel or switch.
- Mount the switch, router and other gear. Support heavy devices from underneath while you fix them.
Step 6: Lay out and label for easy troubleshooting
Plan the layout before you plug anything in. Lenovo advises making a detailed rack layout and placement plan first, so cable routes stay logical.
A layout that works for most small racks, top to bottom:
- Modem and router or firewall
- Cable manager
- Patch panel
- Cable manager
- Switch
- Cable manager
- NAS or recorder
- UPS at the bottom
Some people prefer the patch panel directly above the switch with short leads. Either way, keep power cables on one side and data cables on the other where you can, so a neat bundle is not cut off by a power lead.
Label everything
Use clear, durable labels on every cable. Label both ends, and match the patch panel port number to the wall plate in the room. Add a one-page map pinned inside the door: port number, room, and what is plugged in. When the internet drops at 8am, that page saves an hour.
Leave slack, not spaghetti
Leave enough slack that you can slide a device out, and no more. Bundle cable with Velcro, keep bends gentle, and do not pull cables tight around corners. If a port later seems dead, our guide to an Ethernet port that is not working helps you tell a bad cable from a bad port.
Step 7: Power, earthing and airflow
This is the part not to improvise.
- Power. Plug the UPS into a wall outlet, then connect the rack's gear to the UPS or a rated power distribution unit. Do not exceed the rating of either.
- Earthing. Manufacturers such as Edgecore instruct that the rack is properly grounded, with a good electrical connection at the grounding point and no paint or insulating coating in the way. Any bonding work on a larger or metal cabinet should be done by a licensed electrician.
- Airflow. Keep vents clear, keep the door ventilated, and put blanking panels over empty slots in a cabinet. If the room gets hot, consider fans or air conditioning. If you add air conditioning to the room, fixed-wired units need a lockable isolation switch next to, but not on, the unit, and that is another job for a licensed electrician.
CCTV and access points are often powered through a PoE switch. If that is your plan, see how to choose the right PoE switch for CCTV so the power budget fits the rack.
Step 8: Power up and test
Do not switch everything on at once. Bring up one device at a time and check it.
- Switch on the UPS and confirm it reports normal.
- Power the switch. Enterprise switches such as the Cisco Catalyst 9300 run a power-on self-test of about a minute. If it fails, the system light turns amber, and the manufacturer says failures are usually fatal, so contact support rather than keep trying.
- Check the lights. On Edgecore switches, the power supply and fan lights should be green in normal operation. Your own model's manual will tell you what its lights mean.
- Connect the router and modem, then confirm you have internet on a laptop plugged straight into the switch.
- Test each patch panel port with a cable tester, then plug a device into each wall socket and check it gets a connection.
- Add Wi-Fi access points, cameras and the NAS one group at a time.
- Pull the power on the UPS briefly (when nobody is working) to see that it holds the network up.
- Photograph the finished rack and save your port map somewhere safe.
If you are placing access points as part of the job, our access point placement guide explains the overlap rule, and the network assessment checklist is a good way to document the end result.
Common mistakes to avoid
- buying a rack sized exactly to today's gear, with no room to grow
- mounting heavy items high, so the rack tips or sags
- hiding the rack somewhere hot, then wondering why equipment is unreliable
- skipping labels because "it's only ten cables"
- tight zip ties and sharp cable bends
- overloading one power board
- not keeping a copy of your port map
Our perspective
Most rack problems we see are not equipment problems. They are planning problems: a cupboard that cooks the gear, cables with no labels, or a rack sized with no room for the next three years.
At PC Scientist we start by understanding what you need the network to do, then work backwards to the rack, the cabling and the layout. We design our work so you do not need to know the technical terms, and we explain each step as we go. Our all-in-one approach means one visit can cover the rack, the Wi-Fi, the cameras and the backups, so you are not juggling several tradespeople.
A tidy, labelled rack makes every future fault faster to find. That is the real saving: less downtime, and a network anyone can follow.
PC Scientist
When to get a professional to do it
A small wall-mount rack with a switch and a patch panel is a reasonable weekend job. Call in help when:
- you have more than a handful of wall points to terminate
- the rack will carry a UPS, NAS and recorder together
- you need new power outlets or earthing (an electrician is required)
- the network supports a business, a clinic or a short-stay property where downtime costs money
- the Wi-Fi has dead zones that a better layout could solve
Our Network Scientist service covers network design, installation and tidy-up for homes and businesses across NSW, including the Central Coast, Sydney, Newcastle and Wollongong. If cameras are part of the plan, Security Camera Scientist can cover the site assessment and installation.
We work onsite, give you clear pricing before work starts, and offer no fix, no fee repairs. Tell us what you have and what is going wrong. You do not need to know which service to ask for.

Ready to talk it through? Visit PC Scientist to book an onsite visit or a remote chat.
Sources
- Network Rack: What it is and How it Compares to a 2 Post Rack
- Argent: New Australian designed network/server rack
- The Difference Between Network Racks and Server Racks
- Argent: How to Specify a Server Rack
- How to choose a rack cabinet in seven steps
- How to Choose an IT Rack (Schneider Electric)
- UWA Electrical Services design standards
- Network Tools & Rack Accessories Australia
- APHS ST01:2026.1.1 Telecommunications Cabling Infrastructure
- Server Rack Cable Management (Lenovo)
- Edgecore AS7326-56X Quick Start Guide
- Hager: Isolation switch requirements
- Cisco Catalyst 9300 Hardware Installation Guide
Recommended
- VLANs for Small Business: A Plain-English Guide
- Decide Fast: Network Cabling vs Powerline in Australia, 3 Site Checks
- How to Prewire Your House for Ethernet in Australia
- Audit Ready Network Assessment Checklist for IT Pros and SMBs
Frequently Asked Questions
Straight answers about Network Rack Setup: A Practical Guide for Homes and Offices - without jargon or pressure. Call 0493 563 381 for advice, or get help below.
Want the quickest answer? 0493 563 381 for free advice.
Allow roughly 25 to 30 per cent spare rack units. Argent's guidance calls this a common rule of thumb. It gives you room for another switch, more cameras or a bigger UPS later.
You do not need one for a basic setup. A rack starts to make sense when you have wired points in several rooms, cameras, a NAS or a UPS. It keeps everything in one place, cooler and easier to fix.
Choose a cool, dry, dust-free spot with easy access to the front and back, close to where your cabling comes in and close to power. Avoid hot roof spaces and sealed cupboards with no airflow.
Plugging gear into an existing outlet is fine. Adding new outlets, fixed wiring or earthing is work for a licensed electrician in NSW, and must meet Australian Standards.
Network help across NSW
Still stuck setting up a network rack?
If the steps above did not get the network behaving, that is okay. Get help in your area and we will take it from here.
Start here
Get network help
Optional Need a Sydney city or region?
Choose a side of Sydney
These are Sydney cities and regions, such as the Northern Beaches or Inner West. First tap a side of Sydney. Then open the city or region that covers you.
C Sydney City / Inner 3 areas
N Northern Sydney 5 areas
NW North-West / Central Sydney 3 areas
W Western Sydney 1 area
SW South-West Sydney 3 areas
S Southern Sydney 2 areas
Optional Find your suburb
Type a suburb from our listed coverage. This opens the matching city or region page for this topic. Listed suburb pages are general technology services, not this specialist page.
If your suburb is not listed, use the city or region list above, or call 0493 563 381.
Disclaimer
The information in this article is provided for general educational and informational purposes only. While PC Scientist strives to keep all content accurate and up to date, technology issues can vary depending on your device, software, network configuration, and individual circumstances. Always back up important data before attempting repairs or system changes. If you are unsure or the issue cannot be resolved safely, contact PC Scientist today for professional onsite or remote IT support. PC Scientist is not liable for any loss of data, damage, or other issues resulting from the use of the information provided in this article.